
Gua Sha for Face Slimming: The Complete Step-by-Step Guide to a Sculpted, De-Puffed Face
Gua sha for face slimming has moved from niche wellness practice to mainstream beauty ritual at remarkable speed. Millions of women search for it every month, drawn to the promise of a naturally sculpted, de-puffing routine they can do at home.
What many people do not know is that gua sha carries a 2,000-year history rooted in Traditional Chinese Medicine. It did not begin on TikTok. It began as a healing practice in ancient China, used to stimulate blood circulation and move stagnant qi, the vital energy that Traditional Chinese Medicine believes flows through the body.
Today’s facial gua sha adapts those ancient principles for gentle, modern use on the face. The results are real — but so are the limits. This guide covers both honestly. Here is the complete guide.
What Is Gua Sha and Where Does It Come From
Gua sha translates directly from Mandarin as “scraping redness.” The name reflects its traditional technique — a smooth tool pressed firmly against oiled skin and scraped in long, deliberate strokes. In Traditional Chinese Medicine, this practice moves stagnant qi and promotes blood circulation through the facial muscles and body tissues.
Historically, practitioners applied gua sha to the neck, back, and limbs rather than the face. The pressure used on the body is significantly firmer than what we use on delicate facial skin today. Traditional body gua sha often leaves temporary redness, which signifies increased blood circulation to the treated area.
Facial gua sha evolved as a gentler adaptation. Because the face requires much lighter pressure and more precise strokes than the body, modern practitioners refined the technique specifically for facial muscles, puffiness reduction, and lymphatic drainage. The gua sha tool shapes also evolved — wing, heart, and comb shapes suit facial contours far better than the simple flat boards used on the body.
Does Gua Sha Actually Slim the Face — The Honest Answer
The honest answer is: yes and no. Gua sha for face slimming produces real, visible results — but not in the way some social media posts suggest. Understanding what actually happens prevents disappointment and helps you use the technique effectively.
Gua sha genuinely reduces puffiness by stimulating lymphatic drainage. The lymphatic system, which removes fluid and waste from tissues, has no pump of its own. Gentle manual pressure from a gua sha tool moves lymphatic fluid toward the neck and collarbone, where the body processes and drains it. As a result, the face appears slimmer, more defined, and less bloated — particularly in the morning when fluid naturally pools overnight.
Research supports this mechanism. A randomised controlled trial published on PubMed in 2025 found that regular gua sha significantly reduced muscle tone parameters and produced measurable improvements in facial contours among participants. These findings align with what practitioners and users consistently observe — real, measurable changes in facial appearance with consistent use.

However, gua sha does NOT permanently reshape bone structure. It does not reduce actual fat tissue. It does not produce results comparable to surgical contouring or injectables. What it does produce — more defined jawline and cheekbones, reduced puffiness, improved blood circulation, and relaxed facial muscles — is genuinely worth pursuing for anyone seeking a non-invasive routine.
Choosing the Right Gua Sha Tool for Your Face
The gua sha tool material you choose matters less than most people assume. Both jade and rose quartz tools deliver the same mechanical benefits when used correctly. The difference lies in feel and personal preference. Jade tools feel slightly denser and stay cool longer. Rose quartz tools are lighter and more common in beauty-focused designs.
Tool shape makes a more significant difference than material. The wing-shaped gua sha tool suits jawline and cheekbone work because its curved edge follows facial contours precisely. The heart-shaped tool works well for cheeks and forehead. Comb-tipped tools suit the neck and scalp specifically, since the teeth grip and stimulate larger surface areas efficiently.
Always hold your gua sha tool at a 35 to 45 degree angle against the skin. A flatter angle distributes pressure across a wider area and reduces the risk of bruising. Check your tool before each session for chips or cracks — a damaged edge can scratch the skin barrier and should be replaced immediately. Clean your tool after every use with mild soap and warm water to prevent bacteria buildup.

How to Prepare Your Skin Before a Gua Sha Routine
Preparation determines how effective your gua sha routine actually is. Never apply a gua sha tool directly to dry skin. Without a slip layer between the tool and your face, friction replaces glide — and friction damages the skin barrier rather than benefiting it.
Start by cleansing your face thoroughly to remove all makeup, sunscreen, and daytime buildup. Because a clean face allows the facial oil or serum to absorb properly, this step is non-negotiable rather than optional. Apply a generous layer of facial oil or a lightweight serum immediately after cleansing. The tool should glide without any drag or resistance.
For morning de-puffing sessions specifically, refrigerate your gua sha tool overnight before use. Cold jade or rose quartz constricts blood vessels temporarily and accelerates lymphatic drainage faster than a room-temperature tool. This is the single most effective hack for reducing overnight puffiness quickly.
Step by Step Gua Sha Facial Routine for a Slimmer Face
Gua sha for face slimming follows a specific sequence. Always work from the neck outward and upward. This order matters because it opens the drainage pathways first, giving the fluid from your face somewhere to go.

Neck and Collarbone
Begin at the collarbone and stroke firmly upward along the side of the neck toward the earlobe. Repeat 3 to 5 times on each side. Because lymphatic drainage nodes cluster at the neck and collarbone, starting here opens the entire drainage pathway. Without this step, subsequent strokes simply move fluid without draining it.
Jawline
Place the curved edge of the gua sha tool at the centre of your chin. Stroke firmly along the jawline toward the earlobe. Repeat 3 to 5 times on each side. This stroke defines the jawline, reduces fluid buildup around the jaw, and relaxes the facial muscles associated with jaw tension and grinding.
Cheeks
Start at the side of the nose and stroke outward strokes across the cheek toward the temple. Repeat 3 to 5 times on each side. This drains fluid from the midface area and gradually lifts the cheekbones visually by moving fluid away from the lower face.
Under Eye Area
Apply the very lightest possible pressure for this step. Stroke gently from the inner corner of the eye outward toward the temple. Repeat 3 times only on each side. The under-eye skin is the thinnest on the face. Therefore, this area needs considerably less pressure than any other zone in the routine.
Forehead
Stroke upward from the brow to the hairline, then sweep outward strokes toward the temple. Repeat 3 to 5 times on each side. This releases tension in the forehead facial muscles, which often hold significant stress throughout the day. Furthermore, regular forehead strokes gradually smooth the appearance of expression lines.
Final Neck Drainage
Finish every session with downward strokes along the neck toward the collarbone, completing the lymphatic drainage circuit. Repeat 3 to 5 times on each side. This final step ensures all the fluid moved during the routine drains properly rather than pooling at the neck.
Gua Sha Strokes for Jawline and Cheekbone Definition
The jawline and cheekbones are the two areas most people target with gua sha for face slimming. Both reward precise technique more than any other facial zone.
- For jawline work, hold the gua sha tool with its curved notch positioned directly along the lower edge of the jaw. Apply firm but comfortable pressure. Stroke from the centre of the chin outward along the jawline to just below the earlobe. Use 4 to 5 strokes per side per session. Because the jawline often holds muscular tension from clenching and stress, consistent strokes here visibly sharpen the jaw’s definition over time.
- For cheekbones, position the flat of the gua sha tool just beside the nose. Sweep in long, confident outward strokes across the cheekbone toward the hairline above the ear. Apply moderate pressure — more than the under-eye area but slightly less than the jawline. Use 4 to 5 strokes per side. In addition, angling the tool slightly upward on the cheek stroke creates a subtle lifting effect that enhances cheekbone definition.
After every jawline and cheekbone sequence, always follow with a neck stroke downward toward the collarbone. This ensures the fluid moved from those areas drains completely.

How Often to Use Gua Sha for Best Slimming Results
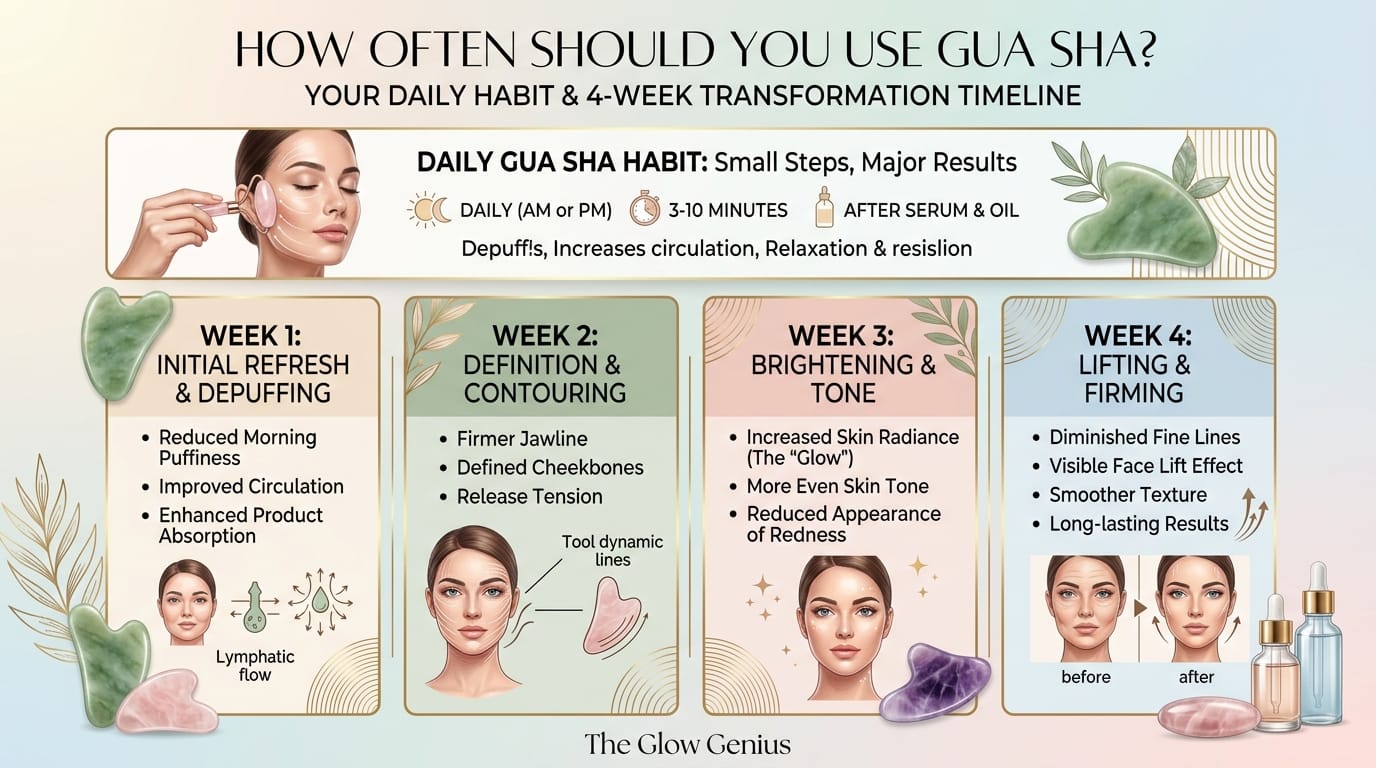
Daily gua sha produces the most consistent and noticeable results over time. Because lymphatic drainage benefits accumulate with regular practice rather than appearing dramatically after one session, frequency matters enormously.
Most people notice a visible difference in puffiness and jawline definition within 2 to 4 weeks of daily use. Morning sessions work best for de-puffing because fluid accumulates in the face overnight. However, evening sessions help release tension and improve blood circulation before sleep, which also supports results.
If daily practice does not fit your schedule, aim for a minimum of 3 to 4 sessions per week. This frequency maintains the lymphatic drainage benefits without allowing significant fluid accumulation between sessions. Consistency at a moderate frequency outperforms occasional intense sessions every time.
Who Should Avoid Gua Sha — Important Safety Information
Gua sha suits most people, but certain situations require caution or avoidance entirely. Always prioritise safety over any aesthetic goal.
Pregnant women should consult their healthcare provider before beginning any gua sha routine, since certain acupressure points on the face and neck connect to areas sometimes avoided during pregnancy.
Anyone who has had recent cosmetic procedures, including Botox injections, dermal fillers, or facial surgery, should wait until fully healed before using a gua sha tool over treated areas. Applying pressure to recently injected or operated tissue risks displacing product or disrupting healing.
Active inflammatory skin conditions require care. Avoid using a gua sha tool directly over inflamed acne lesions, open skin, or active rosacea flare-ups. The mechanical pressure can spread bacteria and worsen skin barrier disruption in these areas. Similarly, broken or sunburned skin should not have any tool applied until fully recovered.
Gua Sha vs Other Facial Sculpting Methods
Method | What It Does | Time to See Results | Cost | Risk Level |
|---|---|---|---|---|
Gua sha | Lymphatic drainage, de-puffing, muscle tension release | 2 to 4 weeks of daily use | Low (tool only) | Very low |
Facial roller | Gentle lymphatic drainage, cooling | 4 to 6 weeks | Low | Very low |
Face massage | Relaxes tension, improves circulation | 2 to 6 weeks | Free | Very low |
Botox | Relaxes muscles, smooths lines, contours | 2 to 14 days | High | Moderate |
Facial yoga | Tones facial muscles over time | 8 to 12 weeks | Free | Very low |
You May Also Like
If you loved this guide, these articles were made for you:
- Homemade Face Mask for Acne: 10 DIY Recipes
- Best Facial Cleansers for Every Skin Concern
- CeraVe vs The Ordinary
- 10 Best Drugstore Skincare Under £5 UK
- DIY Coffee Scrub for Cellulite
FAQs
Your Sculpted Face Starts With This Tool
Gua sha for face slimming works. It works most effectively as a consistent daily ritual rather than an occasional treatment. The de-puffing you see after your first session shows you exactly what becomes permanent with regular practice.
Set realistic expectations. A daily gua sha routine gives you a less puffy, more defined face with better blood circulation and relaxed facial muscles. It does not give you a dramatically different bone structure or permanent fat reduction.
Start with the six-step routine in this guide. Focus on the neck first, then the jawline, then the cheekbones. Practise daily for four weeks. Most importantly, be patient with the process — your face genuinely changes with consistent attention.
Save this guide to your Pinterest boards and share it with a friend who is curious about gua sha but not sure where to start. Your most sculpted face is a daily ritual away. 💎